I have only just discovered washi and am slowly building up my stash but was wanting to be able to keep it all neat and tidy and possibly be able to have some kind of dispenser to cut it as needed.
So one night, when putting away the leftovers, I began to look at the new "easycut" gladwrap dispenser in a new light.
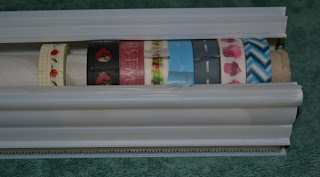
So with a bit of a play with it, I was able to make it into a washi storage and dispenser unit!
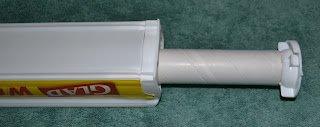
Start by removing the core like you were changing the roll of cling film, the circular piece on one end rotates and pulls out.
Then you need to remove the removable end like this. You may have to cut through the glad stickers on both sides to allow it to come off.
Inside is a flap of plastic that keeps the roll of cling film in place. This needs to be removed as I found the washi would stick to it. This flap can be cut with a craft knife or scissors but I actually found it easier just to tear off after making a small nick at the beginning.
The unit with the flap removed.
Then you need to remove the removable end from the core. Make sure it is the end with the circular piece that you had to twist to remove it from the unit, not the other end.
The core is about the same diameter as the end of the washi so peel back the first layer (white paper) from the core.
Then repeat with a second layer of paper from the core. I found I only had to peel it off about this far, not the entire length of the tube.
I'm not sure if there are different brands of washi but some were on plastic rolls which fit well, but some of my washi are on paper rolls and needed to have a layer of two peeled from the inside of their roll.
Then just thread the washi onto the tube from the peeled end. So that it rolls the right way, you need to have the unpeeled end of the core facing up and have the roll so that it unwraps over the top. Trust me, it is very difficult to use if you it so that it unrolls to the bottom. Unroll a cm or two of the tape to make it easier to find the end when it is all in place. TIP: Place your least used washi on first, that way you dont need to pull all your rolls out to change one when it is used up.
Continue adding the washi ensuring they unroll the correct way. Through trial and error, it is best not to have them all pushed up against each other but to leave a bit of space between them. They do move around a little bit when the dispenser is moved but at least if they start with a gap it is easier.
Thread your completed core inside the unit so that the plastic tab on the end matches up with the notch inside the unit. If your washi is new, it may need a bit of help fitting through the hole but once you use it once or twice it will fit fine. Once they are in, rearrange them a little so that they have gaps between them again.
This is the notch that the tube has to be aligned in.
The end piece can now be put back in. Make sure it goes up the right way, with the cut out part facing up.
Then you just need to put the circular piece you removed at the beginning back on, ensuring that it goes into the core tube, then matching up the notches and turning it.
Sorry about the photo, didnt realise it had a dark patch until I uploaded it. To use, simply pull out the required length of washi ....
then push the lid down hard over the piece of washi. The cutter should line up but if your washi is new (and causing the unit to bulge a little) you may just need to realign the lid a bit.
The cut washi to length washi tape.
Because it is a serrated cutter it leaves a nice rustic, serrated finish to the edge. If you dont like it and want a straight edge, use a pair of scissors to trim it off.
Now my next project will be to remove all the Glad stickers and to decorate it!
I am more than happy for people to share and re-create this but if you do, then please acknowledge me as the original creator.


