Monday, 6 August 2012

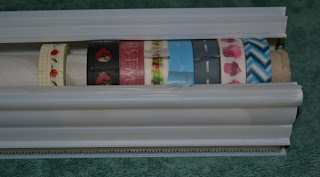
My Washi Storage/Dispenser Unit

Realistically, setting up my craft cave in the garage is still a few more months away, sadly. There are still heaps of boxes and stuff to sort through and work out what we want to keep and what to get rid off, now that we plan to stay here for the forseeable future. So I have a very small section of our bedroom that I keep a small (for me!) amount of my scrapping and other craft gear for the moment.

I have only just discovered washi and am slowly building up my stash but was wanting to be able to keep it all neat and tidy and possibly be able to have some kind of dispenser to cut it as needed.

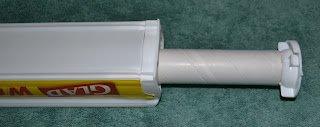
So one night, when putting away the leftovers, I began to look at the new "easycut" gladwrap dispenser in a new light.


So with a bit of a play with it, I was able to make it into a washi storage and dispenser unit!


Start by removing the core like you were changing the roll of cling film, the circular piece on one end rotates and pulls out.


 Then you need to remove the removable end like this. You may have to cut through the glad stickers on both sides to allow it to come off.


Inside is a flap of plastic that keeps the roll of cling film in place. This needs to be removed as I found the washi would stick to it. This flap can be cut with a craft knife or scissors but I actually found it easier just to tear off after making a small nick at the beginning.

The unit with the flap removed.


Then you need to remove the removable end from the core. Make sure it is the end with the circular piece that you had to twist to remove it from the unit, not the other end.


The core is about the same diameter as the end of the washi so peel back the first layer (white paper) from the core.


Then repeat with a second layer of paper from the core. I found I only had to peel it off about this far, not the entire length of the tube.


 I'm not sure if there are different brands of washi but some were on plastic rolls which fit well, but some of my washi are on paper rolls and needed to have a layer of two peeled from the inside of their roll.


 Then just thread the washi onto the tube from the peeled end. So that it rolls the right way, you need to have the unpeeled end of the core facing up and have the roll so that it unwraps over the top. Trust me, it is very difficult to use if you it so that it unrolls to the bottom. Unroll a cm or two of the tape to make it easier to find the end when it is all in place. TIP: Place your least used washi on first, that way you dont need to pull all your rolls out to change one when it is used up.


Continue adding the washi ensuring they unroll the correct way. Through trial and error, it is best not to have them all pushed up against each other but to leave a bit of space between them. They do move around a little bit when the dispenser is moved but at least if they start with a gap it is easier.


Thread your completed core inside the unit so that the plastic tab on the end matches up with the notch inside the unit. If your washi is new, it may need a bit of help fitting through the hole but once you use it once or twice it will fit fine.  Once they are in, rearrange them a little so that they have gaps between them again.


 This is the notch that the tube has to be aligned in.


 The end piece can now be put back in. Make sure it goes up the right way, with the cut out part facing up.


 Then you just need to put the circular piece you removed at the beginning back on, ensuring that it goes into the core tube, then matching up the notches and turning it.


Sorry about the photo, didnt realise it had a dark patch until I uploaded it. To use, simply pull out the required length of washi ....


then push the lid down hard over the piece of washi. The cutter should line up but if your washi is new (and causing the unit to bulge a little) you may just need to realign the lid a bit. 


 The cut washi to length washi tape.


 Because it is a serrated cutter it leaves a nice rustic, serrated finish to the edge. If you dont like it and want a straight edge, use a pair of scissors to trim it off.


Now my next project will be to remove all the Glad stickers and to decorate it!


I am more than happy for people to share and re-create this but if you do, then please acknowledge me as the original creator.



Thursday, 2 August 2012

August P4P Challenge Kit

Another one of my favourite suppliers is Tracy from Passion 4 Papercrafting. This month she created a challenge kit that you had to use to create a layout or card. The rules were that you couldnt add anything about from your plain base card or paper and you could use as little or as much of the kit as you wanted. You could add mists, stamps or inks and you could use  punches or diecut machines with the paper from the kit but you couldnt add any other embellies.

Under the rules of the competition, I cant upload the photo of my creation until after next week so please come back after then to view the card I created.

Of course I would love you to vote for my card so please become a fan of Passion 4 Papercrafting's facebook site and look out for card once voting opens this Friday.

Tuesday, 31 July 2012

Sketch challenge

One of my favourite suppliers is Kerry from Kerry's Crafty Cards and Cuts. This month she has started challenges on her blog. The first was to turn either a layout sketch into a card or a card sketch into a layout (or do both). I choose to turn this:


into this:


Sunday, 29 July 2012

July S2P Inchie swap

I'm still getting my head around inchie's but this is what I created for the July Inchie swap over at Scrapping 2 Perfection.

The theme was free choice, so I chose flowers and bling!


Thursday, 26 July 2012

My CHA Craft Swap Gift from Adornier

In my last post, I showed the Birthday Card Organiser and bundle of 10 birthday cards I made for Sheryl of Adornier for the 2012 Contemporary Handmade Alliance Craft Swap. Now its time to show you what she made for me:

 A beautiful matching earring and necklace set and ....

 .... this wonderful tote bag. The inside has pockets all around to keep all the small stuff separated. Although I still generally lug a nappy bag around everywhere I go, I do look forward to the day when I can permanently say goodbye to it. And the times I dont take the nappy bag, I seem to take an enviro bag rather than a handbag, so this is going to be just perfect.

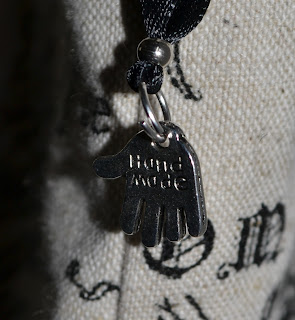
 I love the care and effort Sheryl put into creating this bag for me and all the little details she included such as this little "hand made" charm. 


If you too create handmade items then consider being a part of the CHA Craft Swap next year. The rules are very simple see here for details, follow the CHA blog or Facebook page and watch out next May/June for the signup.

Sunday, 22 July 2012

Where have I been?

Whoops. I didnt realise it was so long since I last posted. Life can be so hectic sometimes but I have still made sure there has been time for crafting.

In the school holidays, my family enjoyed a lovely time away at Warrnambool on the Victorian ShipWreck Coast for the Fun 4 Kids Festival which we had such a fun time at and there was activities suitable for all my boys. Even though we have just upgraded our car to a Kia Carnival as we really werent fitting into the Pajero anymore, space was still reasonably tight with the 6 of us, but I did manage to sneak in a small (for me!) craft tote as I was working on a very special project for the 2012 Contemporary Handmade Alliance Craft Swap. This is the 3rd year it has run and the 3rd year I have been involved. In 2010, I received a lovely handmade tote from Piper and Lily which I still occassionally use. Unfortunately, even though my swap partner received a lovely package from me, I received nothing (but excuses) from them. As I was in my 3rd trimester in a very difficult pregnancy and about to move house, I didnt have the energy to chase them up too much, but I did let the organiser know that they hadn't completed the swap. As disappointing as it was, I'm not bitter about it, I just hope they appreciate the time, effort and expense that went into creating something special for them.

While I was away, this is what I had been working on for the lovely Sheryl at Adornier.

 A birthday card organiser and ....


.... 10 birthday cards to go in it.


The birthday card organiser has pockets for each month and on the pocket is each of the dates for that month. You simply fill in the name of the person next to the date of their birthday and store the card you've decided to give to them in the pocket, ready for posting or giving it to them. If you are really organised, you can fill it up during the year and have them sitting there ready to go, or do a month at a time or if you are like me, use it as a reminder for whose birthday you need to make a card for and store spare ones in the pockets!


 With album rings as a hinge and a ribbon to tie it together, it can expand pretty wide.

 Each double page was decorated differently, but this shows the pockets with the dates for that month on it.


 THE CARDS

 I love how just a bit of pen ink (the outline around the plane) can really make a die cut pop!


 Black and white always looks effective together and I am still loving using bottle tops. I think the doily flower looks wonderful in the middle of the bottletop.


 3 little boat die cuts each in their own frame, some lettering, a few bits of bling and some printed background paper makes a very easy but effective card.


My 3 oldest boys loved this card. Why? Because it is Herbie the Love Bug. I really love the road Washi tape. I can see quite a few little boys I know receiving a card along these lines.


 Again, 3 die cuts on their own frames, some lettering and bling, but this time it is a cut out card and although it is hard to see, the cupcake frames are standing up through the die cut squares of the card.


 Sometimes the card I have in my mind does not quite translate into reality and that is wahat happened here. I dont know if it is because the red contrasts too much with the blue of the dragon, but I didnt like this card, it didnt turn out at all the way I had planned it to in my head. But I kept it in as when I asked my boys if they liked it, all 3 said "Yeah it's cool" or "Yeah can I have it?" So if it has my boys approval than I thought some other little boy (or girl) would love to receive it.


 A flourish rub on, fabric flowers, some bling and lettering, I love the simplicity of this card but it does look so beautiful and tactile.


I found it hard to give this card away to a complete stranger, I just fell in love with it. Just means I will have to make it again.


 The bear and borders were from a paper tole kit, and teamed with a die cut banner, greeting sticker and some matching paper, again it was very simple but effective. And in real life, the paper tole effect is much more pronounced.


The last card of the pack. Some cupcake Washi tape, a few die cuts, a stamped greeting and outlined in pen. Another simple but effective card that I am sure any little girl would love to receive.


Thursday, 21 June 2012

June Cardmaking's COTM

Because I find that it is just too difficult to get to classes or workshops, I suscribe to 2 Card of the Month kits. This is my creations from the June COTM kit from cardmaking.net. I love this stores kits as you do 4 cards using the same materials, I can keep one and use or sell the others.


This month's kit was all about using cutout cards from Romak, mulberry paper, border stickers and a paper tole embellishment.


Although paper tole can be difficult to cut out, I love using it on my cards as I think it gives a lovely layered effect.

June and July S2P Card swaps


June's Card swap for Scrapping2Perfection was a Happy Birthday card. I have only just discovered bottlecaps and loved using them for these cards. They make a great centre for the concertina flowers.


July's card was a sketch from the cardpatterns.blogspot.com again, no 80.


Wednesday, 20 June 2012

June and July S2P ATC swap

I'm jumping the gun a bit on uploading these as I haven't yet sent them, but wanted to show them off, and if I leave it to after I send them, I will probably forget!


But this is the ATC I made for the Scrapping2perfection June ATC swap. It was a "recipe" theme where we had to use:
* white (the butterfly and some of the flowers)
* inking (for the stamp)
* punch outs (the bouquet wrapper, bow and saying background)
* flowers (pretty obvious)
* stamp (says "thanks for being there")

I had purchased different bouquet wrappers from an ebay seller previously but when I went to use them, they were way too big. So after a bit of thought, I decided to make my own using my cuttlebug to cut a doily shape, which I then cut down. Worked out okay, I thought.


As we work on 2 months swaps at a time, here is the Scrapping2perfection July ATC swap. The theme this month was an inspiration picture.


The butterflies I purchased from Chickenfeed, one of my favourite stores to get craft supplies. The flower is layered and is cut using my cuttlebug and then had a pattern embossed on it. The jewels are also from Chickenfeed.


April and May S2P Card swaps


The card I made for the Scrapping2perfection April card swap. The theme was sketch no 138 from cardpatterns.com.


May's Scrapping2perfection card swap was also a sketch from cardpatterns.com, this time it was sketch no 120.